
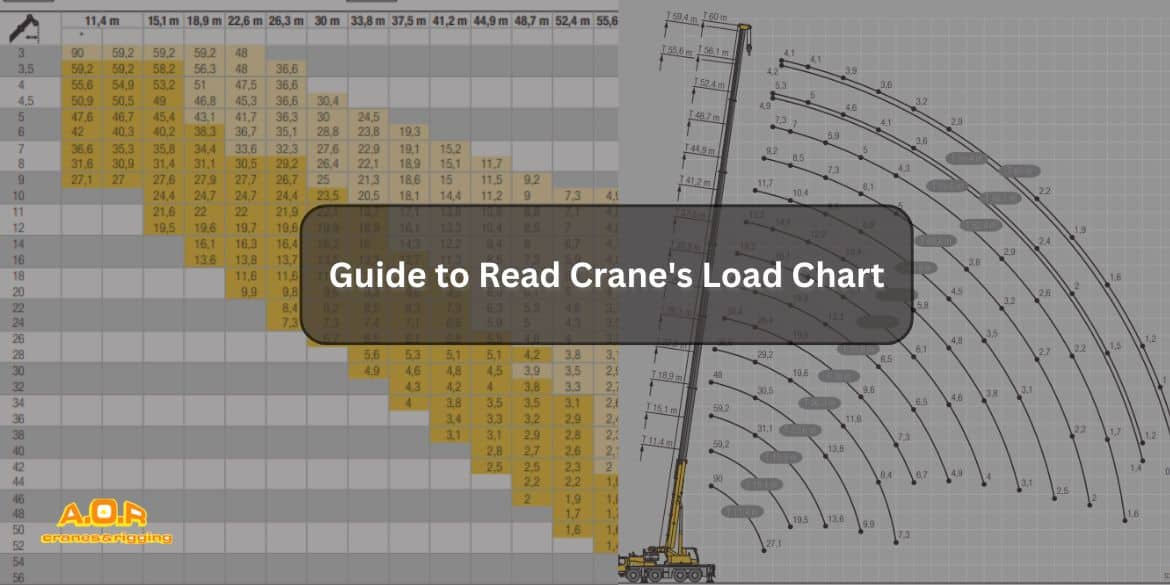
How to Read a Crane Load Chart
Whether you’re a crane operator, site engineer, project manager, or simply curious about heavy machinery, understanding a crane load chart is essential. These charts aren’t just numbers, they’re safety lifelines, performance indicators, and planning tools all rolled into one.
What Is a Crane Load Chart?
A crane load chart is a guide that tells you how much weight a crane can safely lift in different situations. It’s one of the most important tools for crane operators. Every crane has its own unique load chart, and it must be followed carefully to avoid accidents.
The chart shows details like:
- How long the crane’s boom (arm) is extended
- How far the load is from the center of the crane (called the radius)
- The angle of the boom
- How much counterweight is added to balance the crane
All these things affect how much weight the crane can lift. For example, a crane might lift 20 tons if the boom is short and the load is close. But if the boom is long and the load is far away, it might only lift 5 tons.
Operators use this chart before every lift to make sure the crane is set up correctly. Ignoring the load chart can lead to serious problems like tipping over, damaging the crane, or injuring people.
Elements of a Crane Load Chart
Understanding a crane load chart requires familiarity with its primary elements:
- Boom Length: This is the extended length of the crane’s telescopic boom. As the boom extends, its ability to lift heavy weights decreases due to leverage.
- Radius: The radius refers to the horizontal distance from the centre of the crane’s slewing ring (the rotation point) to the centre of gravity of the load. The further the load is from the crane, the less weight the crane can lift safely. It’s critical to measure this accurately at ground level.
- Lifting Capacity: This is the maximum weight the crane can lift for a given boom length and radius. It is usually shown in tons or kilograms. These figures take into account factors like structural integrity, balance, and mechanical strength.
- Counterweights: Counterweights are critical for balancing the crane and preventing tipping. More counterweight typically increases lifting capacity.
- Boom Angle: The boom angle, measured in degrees, influences lifting capacity. A more vertical boom increases the crane’s lifting power, while a flatter angle reduces it due to greater leverage and horizontal reach. Charts often include a column or graph to reflect angle data.
- Outrigger Positions: Outriggers provide stability by extending the crane’s base. Load charts vary depending on whether the outriggers are fully extended, partially extended, or retracted.
How to Read a Crane Load Chart
Even with modern tech and warning systems, knowing how to read a crane load chart is key. It helps you understand how much weight the crane can safely lift based on boom length and angle.
Let’s understand using the below load chart of Liebherr LTM 1090-4.
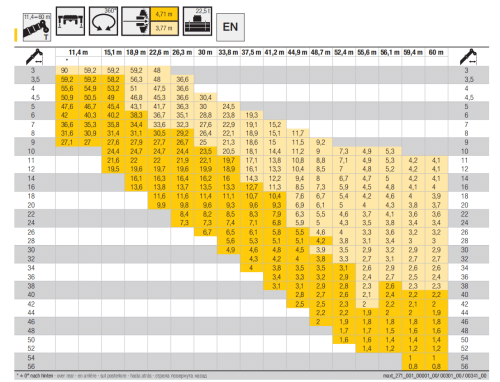
Step 1: Understand the Axes
Top Row (Horizontal Axis): Boom Length
These numbers (11.4 m to 60 m) show how far the crane’s boom is extended. A longer boom allows you to reach farther but reduces lifting strength.
Think of the boom like your arm – the more you stretch it, the less weight you can hold comfortably.
Left Column (Vertical Axis): Load Radius
This is the horizontal distance from the centre of the crane to the load in metres. The further out you need to reach, the less weight the crane can safely lift.
Imagine holding a bucket close to your chest – easy, right? Now try holding it at arm’s length – much harder. That’s how radius works!
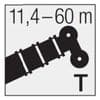
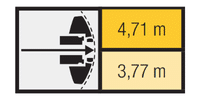
Step 2: Understand the Crane Setup Icons
The small icons at the top tell you the conditions this chart is based on:
- Boom Length Range Symbol: This shows the range of the boom lengths (main boom) the load chart covers, from 11.4 meters to 60 metres.

- Outriggers Symbol: This symbol shows the crane is working with outriggers fully deployed and extended.
- Slewing Range Symbol: The crane’s boom can rotate 360 degrees and still maintain the lifting capacities shown.
- Boom Head Radius Symbol: This refers to the radius from the center of the crane to the load line due to the boom head or attachment in use, here it is 4.71 m / 3.77 m.

- Hook Block / Tool Capacity Symbol: The lifting tool (hook block or pulley system) used with this crane setup is rated for 22.5 tonnes.
Picture


Important: This chart only applies under these specific setup conditions. If you’re using the crane on wheels (no outriggers), or on a slope, the values will be different.
Step 3: Match Boom Length and Radius to Find Lifting Capacity
Now let’s find the actual lifting capacity for a specific setup:
Let’s say your crane boom is extended to 26.3 meters, and the load you want to lift is 10 meters away from the base. To find the lifting capacity find cell where boom length is 26.3m and radius 10 at the intersection you can determine the max load capacity.
Always choose the closest lower value if you fall between grid points. Never round up!
Step 4: Adjust for Hook and Rigging
Subtract the weight of the hook block, rigging, and slings from the rated capacity. For instance, if the hook block weighs 530 kg, and the chart shows 36.3t at a given setup, the real payload capacity is 35.77t.
Many incidents occur because teams forget to factor in the total rigging weight, especially with multi-part reeving or specialty hooks
Step 5: Understand the Color Coding (Shaded Areas)
- Yellow cells: These are safe, tested lifting capacities
- Gray or empty cells: These are outside the crane’s safe limits
The farther you move to the right or down in the chart (longer boom or larger radius), the lifting capacities decrease sharply — and in some areas, lifting is completely restricted.
Step 6: Factor in Real-World Conditions
While this chart gives precise numbers, there are various factors that affect lifting capacity of crane in field:
- Wind speed: Can destabilize the crane
- Ground condition: Soft or uneven ground can cause tilting even with outriggers
- Swinging loads: Movement can reduce stability
- Operator error: Misreading radius or misjudging angles can be dangerous
That’s why load charts are only part of the safety equation. Always use them with rigging guides, site planning, and operator training.
How to Read a Crane’s Working Range Diagram
Crane’s working range diagram is a visual representation of a load chart. shows how far and how high a crane can reach at different boom lengths and angles. It’s like a map of the crane’s movement – helping you see where the crane can safely place or pick up a load
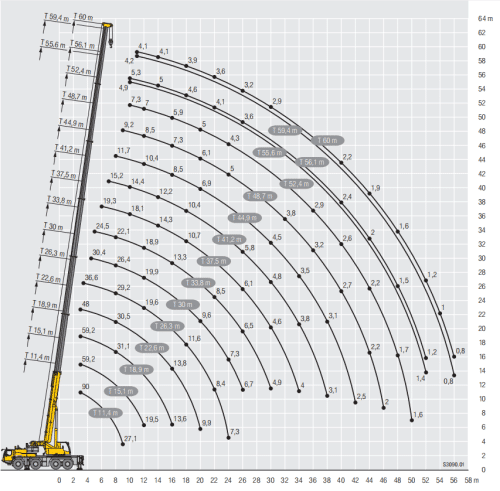
What It Shows:
- Horizontal Axis (X-axis):
Represents the working radius – the distance from the crane’s centre to the load on the ground. - Vertical Axis (Y-axis):
Shows the lifting height – how high the crane can lift a load at a specific radius. - Curved Lines or Arcs:
Each curve represents a different boom length. These show the crane’s reach and lift height when the boom is extended to that length.
Example:
If a crane needs to lift a load at a 20-metre radius and place it at 15 metres high, the diagram helps check if that’s possible with the boom length you’ve set.
Avoiding Common Mistakes
- Using the Wrong Chart: Each chart corresponds to a specific configuration. Mixing them up gives misleading capacity values and can lead to dangerous assumptions.
- Ignoring Accessories: Always factor in the weight of slings, hooks, and lifting attachments. Even a simple lifting beam can add hundreds of kilograms.
- Measuring Radius Incorrectly: Use precise measurements from the centre of rotation, not the crane’s body or tracks. Incorrect radius is one of the leading causes of miscalculated lifts.
- Disregarding Wind and Terrain: Even a safe lift can fail if wind is excessive or the ground is unstable. Use tools to adjust footing and stay within safe margins.
Final Thoughts
Crane load charts aren’t just documents, they’re safety tools. They tell the story of what your crane can and can’t do. When read correctly, they prevent accidents, ensure compliance, and save both time and costs. That’s why it’s crucial to always match the chart to your crane’s exact configuration, measure the radius and boom angle precisely, account for the rigging weight, adjust for environmental conditions, and double-check all your calculations.
If you’re looking for professional crane services, equipment, or consultation for your next lift, AOR Cranes is your trusted partner. We specialize in providing reliable crane hire and lifting solutions across Australia, backed by deep industry expertise and an unwavering commitment to safety.
AOR Cranes is dedicated to delivering top-notch crane hire services with safety, reliability, and expertise at the core. With over 30 years of experience, we handle every project with care and expertise to meet your needs.