

How to Calculate the Right Crane Size for Your Construction Project
In Australian construction projects, whether it’s a commercial high-rise in Sydney or a wind farm installation in regional NSW, the crane you choose can either ensure a seamless lift or cause expensive delays and serious safety hazards. The right crane size impacts not only your lifting capacity but also your project timeline, budget, and compliance with Work Health and Safety (WHS) regulations.
Why Selecting the Right Crane Size in Project Planning Is Critical
Overestimating crane size often leads to unnecessary costs and operational inefficiencies. Larger cranes come with higher rental fees and longer setup times and often require special permits or road closures, especially on tight urban sites like in Sydney. They also take up more space, which can disrupt workflow and limit access for other trades on site. While a bigger crane might seem safer, it rarely adds value if it’s more than what the job truly needs.
Underestimating crane size, however, is far more dangerous. A crane that’s too small for the load or radius increases the risk of tipping, failed lifts, or load drops, any of which can halt the job and compromise site safety. It also raises the chance of exceeding ground pressure limits, especially on soft or uneven terrain. These mistakes can result in serious damage, compliance breaches, and costly project delays.
4 Key Factors That Determine Crane Size
Crane size isn’t just about how “big” a crane looks, it’s defined by how much it can lift at a specific radius and height under given site conditions. Here’s a breakdown of what goes into that decision:
1. Load Weight
This is the total mass the crane will lift and includes:
- The item itself (e.g., precast concrete slab)
- Rigging gear (slings, shackles, spreader beams)
- Hook block weight
Formula:
Total Load (t) = Object Weight + Weight+Rigging + Lifting Gear
Pro tip: Always overestimate rigging by at least 10% if you don’t have the exact figure. Rigging loads often go overlooked in planning.
2. Lift Radius
Lift radius is the horizontal distance between the crane’s center of rotation (slew ring) and the vertical center of gravity of the load.
- Why it matters: As the radius increases, the crane’s lifting capacity decreases dramatically due to the leverage effect.
- Example: A 100-ton crane might lift 80t at 4m but only 8t at 20m.
- How to measure: Use CAD software or physical site layout measurements from crane pad to load drop zone.
3. Lift Height
Lift height is the vertical distance the crane must raise the load, from ground level to its final position. It directly influences the required boom length and may call for extensions like fly jibs or luffing jibs to reach over structures.
When calculating lift height, account for
- Building or structure height
- Rooftop elements like parapets or plant equipment
- Necessary clearance above the load
- Final placement elevation
In high or confined areas, accurate lift height is crucial to avoid boom collisions and ensure safe, efficient crane setup.
4. Site Conditions
Ground conditions, access paths, and space availability directly impact crane type and configuration.
- Soft ground? Use crawler cranes with low ground pressure.
- Limited access? Choose Franna or city cranes.
- Obstructions like trees or power lines? Consider slewing radius and clearance.
3 Formulas to Estimate Required Crane Capacity
While professional lift plans always involve crane load charts, these formulas help provide a solid initial estimate.
1 Calculating Load Moment
Load moment is the turning force that the crane must resist to safely lift a load at a specific radius. It is a product of the load’s weight and the horizontal distance (lift radius) from the crane’s center of rotation to the load’s center of gravity. The greater the radius, the more torque (or tipping force) is exerted on the crane.
Many crane manufacturers express this as ton-meters ™, a standard unit used to rate a crane’s lifting performance at different radii. Most crane load charts are based on load moment limits. If your calculated load moment exceeds what the crane can handle at that radius, the lift is unsafe.
Formula:
Load Moment (tm) = Load Weight (t) × Lift Radius (m)
Example Calculation:
- Load Weight = 12 tons
- Lift Radius = 20 meters
Load Moment = 12 × 20 = 240 ton-meters (tm)
What this means:
Your crane must have a rated capacity of at least 240 tm at a 20-metre radius. You would then check the crane’s load chart to confirm it can safely handle this load at that specific radius. If not, you’ll need to either reduce the radius (move the crane closer) or choose a higher-capacity crane.
2 Required Crane Size Estimate
To estimate the minimum crane capacity required to handle a specific load at a given radius. It uses the previously calculated load moment and divides it by an efficiency factor (E), which accounts for real-world variables like crane type, lift complexity, wind conditions, and safety margins.
The efficiency constant typically ranges from 0.6 to 0.85:
- Use 0.85 for ideal conditions (short lifts, minimal obstacles).
- Use 0.6–0.75 for more complex lifts or conservative planning.
Formula:
Crane Size (t) = Load Moment (tm) / E
Example Calculation:
- Load Moment = 240 tm
- Efficiency constant (E) = 0.75
Crane Size = 240 / 0.75 = 320 tons
What this means: You should consider a crane rated at least at 320 tons to lift the load safely at that radius.
Reminder: This is a preliminary estimate, always verify with the actual crane’s load chart at the intended radius.
3 Calculating with Boom in Crane
This formula estimates the required crane capacity by factoring in the boom angle—which becomes critical when lifting to high elevations or in confined spaces. The boom angle (θ) affects the tension in the crane’s structure and the effective capacity at extended reach. A steeper boom angle generally means better lifting capacity, while a shallow angle increases leverage and strain.
This method is useful when you already know your boom length and radius, and need to understand the stress placed on the crane’s structure due to geometry.
Formulas:
- Calculate boom angle:
θ = arcsine (Radius / Boom Length) - Calculate adjusted crane capacity:
Effective Capacity (t) = Load × Radius / sin(θ) × E
Where:
- Load = lifting weight in tons
- Radius = lift radius in meters
- Boom Length = actual or planned boom extension
- θ = boom angle (in degrees or radians)
- E = efficiency constant (typically 0.6–0.85)
Example Calculation:
- Load = 10 tons
- Radius = 22 meters
- Boom Length = 30 meters
- E = 0.75
Step 1: θ=arcsine(22 / 33 ) ≈ 47.7∘
Step 2: sin(47.7∘)≈0.739
Step 3: Effective Capacity = 10×22 / 0.739×0.75 =0.554220 ≈ 397.8 tons
What this means:
To safely lift a 10-ton load at a 22-metre radius with a 30-metre boom, the crane should be rated for approximately 398 tons under these geometry and efficiency assumptions. This accounts for the actual stress caused by the boom angle, which may not be obvious from basic load moment calculations alone.
As always, validate this estimate using the actual crane’s load chart for the given boom configuration.
Using Load Charts to Finalize Crane Selection
Once you’ve estimated the required crane size using formulas, the next step is to validate your choice using the manufacturer’s load chart. Load charts provide precise information on how much weight a crane can safely lift at various boom lengths and radii. These values vary depending on the crane’s configuration, outrigger position, and boom setup.
For example, based on an actual load chart for an all-terrain crane
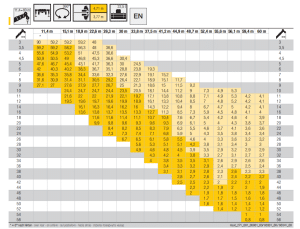
The chart shows:
- Boom lengths along the top row (from 11.4m to 60m)
- Lift radius down the left column (from 3m to 56m)
- Rated lifting capacities in tons at each combination of boom length and radius
Read more for a detailed guide: How to read a crane’s load chart
Key Considerations
- Always allow a buffer of 10–25% over the actual load for safety and regulatory compliance.
- If you’re close to the limit (like lifting 9.9t with a 10t capacity), opt for a stronger configuration or shorter radius.
- If your lift setup involves obstructions, tight angles, or dynamic loading, increase the safety factor or choose a larger crane.
Using the load chart ensures that you’re not just making theoretical estimates; you’re validating them against the actual performance limits of the specific crane model in your fleet or rental plan. Always consult the full chart, including notes on outrigger configuration, wind limits, and boom extension setups, before finalizing crane selection.
5 Types of Cranes and Their Relevance to Sizing
Different crane types suit different projects. Here’s how they compare:
All-Terrain Cranes
- Versatile for urban and regional projects requiring long reach and high capacity
- Can travel between job sites without needing special transport logistics
- Ideal for multi-story structural steel installs, bridge components, and HVAC lifts
Crawler Cranes
- Provide excellent lifting capacity on soft, unstable, or unsealed ground
- Ideal for large-scale infrastructure and industrial plants with longer setup durations.
- Less mobile but extremely stable with low ground pressure
Franna Cranes (Pick & Carry)
- Perfect for congested, fast-moving jobs where mobility is key
- Commonly used for machinery relocation, pipe sections, and modular components
- Highly effective for plant maintenance or short transport inside yards
Tower Cranes
- Stationary cranes used in high-rise construction, where frequent vertical lifts are needed
- Requires long-term setup and foundation but offers excellent lift repetition
- Suitable for inner-city developments with height restrictions on mobile cranes
Rough Terrain Cranes
- Compact and capable in off-road conditions such as mines, dams, or pipeline routes
- Ideal for uneven or sloped terrain where crawler deployment isn’t viable
- Easy to set up and operate in remote civil sites
5 Common Mistakes to Avoid When Estimating Crane Size
- Ignoring Rigging Loads: Often contributes 5–15% to total load. Always include.
- Underestimating Radius: Site layout changes can increase swing radius. Validate in the final lift plan.
- Choosing Based on Tonnage Alone: Rated capacity applies only to specific configurations. Always verify with the load chart.
- Overlooking Ground Conditions: Check allowable ground pressure and use appropriate outrigger pads.
- Not Factoring Safety Margins: Critical lifts or congested sites require engineered lift plans and redundancy.
Checklist for Accurate Crane Sizing
- Confirm actual load weight (including rigging)
- Measure true lift radius from crane base
- Determine vertical lift height
- Assess site access, terrain, and obstructions
- Estimate required crane capacity using formulas
- Consult load charts for final selection
- Include 10–25% safety margin
- Ensure compliance with Australian lifting standards
- Engage crane engineers for critical or tandem lifts
Conclusion
Crane sizing requires more than guesswork, it demands precise calculations, site awareness, and manufacturer data. Whether you’re lifting steel in the CBD or solar panels in regional NSW, accuracy ensures safety, efficiency, and WHS compliance.
AOR Cranes offers expert crane hire services across Sydney, New South Wales, with a fleet that includes Franna, mobile, and all-terrain cranes. Backed by experienced operators and engineered lift planning, we ensure every lift is completed safely, efficiently, and on budget.
AOR Cranes is dedicated to delivering top-notch crane hire services with safety, reliability, and expertise at the core. With over 30 years of experience, we handle every project with care and expertise to meet your needs.